Android系统顶上的状态栏是属于FrameWork的东东,由于项目上需要对状态栏进行一些修改调整,我对其作了一个初步研究,写出来大家共享一 下,其实这些早已写了,只是想等研究StatusBar中ExtendsView后再整理一个blog,不过现在已经没有时间了,目前深入研究 Android Binder机制,废话不多少,开始进入statusbar的探索
1.先从StatusBar的布局文件入手,文件位置位置:frameworks/base/core/res/res/layout/status_bar.xml
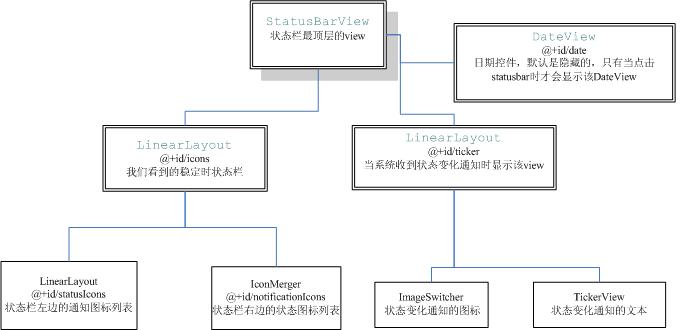
2.我对status_bar.xml布局文件进行分析,画出结构图,以便对StatusBar有一个整体的了解:

3.com.android.server.status.StatusBarView--statusbar的最顶层view,直观上我们是看不到它的
4.LinearLayout android:id="@+id/icons" 我们看到的状态栏,系统默认是左边放通知图标notificationIcons,右边放状态图标statusIcons
--1.通知图标区域: IconMerger android:id="@+id/notificationIcons"
--2.状态图标区域:LinearLayout android:id="@+id/statusIcons"
我对status_bar.xml做了修改,notificationIcons的background="#ff0000",statusIcons的background="#0000ff",下面就是现实效果

(图1)
5.那么LinearLayout android:id="@+id/ticker"显示在哪里呢,在正常情况下ticker是不显示的,只有在StatusBarService收到通知 时它才显示,比如SD卡拔出时,我也截了一张图,在前面我已经修改了status_bar.xml并修改它 android:background="#0000ff"大家可以看一下效果:

(图2)
6.最后一个是DateView,它是在点击statusbar时才显示的,默认是隐藏的
7.StatusBar的ui框架就这些,是不是很简单,接下来,我们肯定还有些问题:StatusBarView是如何被创建的呢?上面那个状态时钟图标如何被加载的呢?通知图标如何被加载的?下面我将继续讲解。 8.StatusBarView创建 StatusBarView是如何被创建的呢,这得从system_process说起,在system_process构建时,会运行ServerThread.run方法加载各种系统服务,其中有一个服务就是StatusBarService:

看上面调用堆栈图,StatusBarService会调用一个makeStatusBarView的方法,在里面它创建了StatusBarView
9.状态图标的加载
我们前面讲过,StatusBarView的子View LinearLayout android:id="@+id/icons"它包含一个通知图标栏,见(图1)中的红色部分,一个状态图标栏:见(图1)中的蓝色部分,但是这个并没 有包含上面的图标,如时间图标(注意右边显示的时间也是一个Text类型的图标,刚开始我也不理解,在status_bar.xml中找了半天没有找到 它),那么这些图标又是怎么样被加载上去的呢?还是看ServerThread.run,在ServerThread.run中调用了
com.android.server.status.StatusBarPolicy.installIcons(context, statusBar);//装载状态栏的图标
进入这个函数看它如何实现的,installIcons静态方法直接调用了构造函数StatusBarPolicy去实现这个操作了:
private StatusBarPolicy(Context context, StatusBarService service) {
// 构建设置图标... // 注册广播接收器,接收各种图标状态变化消息,以此更新状态栏图标 }代码太多,我就以时间图标为例,进行代码说明,代码在StatusBarPolicy构造函数中:
//构建时间图标的IconData对象,类型为TEXT
IconData mClockData = IconData.makeText("clock", ""); --IconData.makeText(String slot, CharSequence text) { IconData data = new IconData(); data.type = TEXT; data.slot = slot; data.text = text; return data; } //调用addIcon方法添加一个状态图标到状态栏 IBinder mClockIcon = service.addIcon(mClockData, null);-->IBinder service.addIcon(IconData data, NotificationData n) { int slot; // assert early-on if they using a slot that doesn't exist. if (data != null && n == null) { slot = getRightIconIndex(data.slot); if (slot < 0) { throw new SecurityException("invalid status bar icon slot: " + (data.slot != null ? "'" + data.slot + "'" : "null")); } } else { slot = -1; } IBinder key = new Binder(); addPendingOp(OP_ADD_ICON, key, data, n, -1); return key; }
//获取系统时间,并更新时间图标 updateClock(); -->updateClock() { mCalendar.setTimeInMillis(System.currentTimeMillis()); mClockData.text = getSmallTime(); mService.updateIcon(mClockIcon, mClockData, null); }
注意代码中我标注为绿色的一个StatusBarService.addPendingOp方法,它会创建一个PendingOp对象op,然后设置op.code=OP_ADD_ICON,然后交给StatusBarService.mHandler去处理,我们根据OP_ADD_ICON搜索mHandler.handleMessage方法:
//前面函数逻辑我省略了
if (doOp) { switch (op.code) { case OP_ADD_ICON: case OP_UPDATE_ICON: performAddUpdateIcon(op.key, op.iconData, op.notificationData); break;根据op.code==OP_ADD_ICON,线程会调用performAddUpdateIcon方法:void performAddUpdateIcon(IBinder key, IconData data, NotificationData n)由于这个函数是更新状态图标和通知图标的统一入口函数,它提供了两个入口参数,IconData data, NotificationData n,当我们添加的是时间图标的时候,n==null:
void performAddUpdateIcon(IBinder key, IconData data, NotificationData n){
// n != null means to add or update notification if (n != null) { ... } // to add or update icon ,this also incluce Notification icons synchronized (mIconMap) {//mIconMap中缓存了所有显示的和不显示的通知图标和状态图标 StatusBarIcon icon = mIconMap.get(key);//first to get icon from mIconMap if (icon == null) {//if get icon from mIconMap is null,we should to add it // add icon LinearLayout v = n == null ? mStatusIcons : mNotificationIcons; //创建一个状态图标 icon = new StatusBarIcon(mContext, data, v); mIconMap.put(key, icon); mIconList.add(icon);//mIconList应该是显示的状态图标if (n == null) {//n==null,说明在添加状态图标 int slotIndex = getRightIconIndex(data.slot);
StatusBarIcon[] rightIcons = mRightIcons; if (rightIcons[slotIndex] == null) { int pos = 0; for (int i=mRightIcons.length-1; i>slotIndex; i--) { StatusBarIcon ic = rightIcons[i]; if (ic != null) { pos++; } } rightIcons[slotIndex] = icon; mStatusIcons.addView(icon.view, pos);//mStatusIcons==LinearLayout android:id="@+id/statusIcons" } else { Slog.e(TAG, "duplicate icon in slot " + slotIndex + "/" + data.slot); mIconMap.remove(key); mIconList.remove(icon); return ; } } else {// is notification add notification icon ... } } else {//icon!=null说明是图标更新 if (n == null) {//状态图标更新 // right hand side icons -- these don't reorder icon.update(mContext, data); } else {//is notification to update notification icon ... } } }结合我的红色部分的注释,认真看完该函数的代码,相信你已经知道状态图标添加的详细过程。
10.通知图标的加载
我以sd卡插入状态栏通知为例进行说明。当sd 插入,代码会执行怎样的逻辑,先看一下调用堆栈:
StatusBarService.addIcon(IconData, NotificationData) line: 423 NotificationManagerService.enqueueNotificationWithTag(String, String, int, Notification, int[]) line: 745 NotificationManager.notify(String, int, Notification) line: 110 NotificationManager.notify(int, Notification) line: 90 StorageNotification.setMediaStorageNotification(int, int, int, boolean, boolean, PendingIntent) line: 478
调用进入了StatusBarService.addIcon函数,跟前面添加状态图标调用的是同一个函数,只是参数IconData==null,而 NotificationData!=null。接下来执行逻辑差不多,StatusBarService.addPendingOp方法,它会创建一个 PendingOp对象op,然后设置op.code=OP_ADD_ICON,然后交给StatusBarService.mHandler去处理,根据op.code==OP_ADD_ICON,线程会调用performAddUpdateIcon方法:
void performAddUpdateIcon(IBinder key, IconData data, NotificationData n)
throws StatusBarException { //省略无关代码 if (n != null) { //这里我省略了一段逻辑了,是跟ExpandedView相关,当我们点击statusbar往下拖动会展开一个ExpandedView,这个以后再说 //不深入展开了,当收到一个通知,这里判断通知view列表中是否存在这个通知view,若不存在添加,若存在,更新 // 添加要显示的通知到队列中,tickerview会依次显示出来,效果如(图2) if (n.tickerText != null && mStatusBarView.getWindowToken() != null && (oldData == null || oldData.tickerText == null || !CharSequences.equals(oldData.tickerText, n.tickerText))) { if (0 == (mDisabled & (StatusBarManager.DISABLE_NOTIFICATION_ICONS | StatusBarManager.DISABLE_NOTIFICATION_TICKER))) { mTicker.addEntry(n, StatusBarIcon.getIcon(mContext, data), n.tickerText);//添加一个通知到tickerview } } }// to add or update icon ,this also incluce Notification icons
synchronized (mIconMap) { StatusBarIcon icon = mIconMap.get(key);//从缓存中查看是否已存在该图标 if (icon == null) {//if get icon from mIconMap is null,we should to add it // add LinearLayout v = n == null ? mStatusIcons : mNotificationIcons;icon = new StatusBarIcon(mContext, data, v);
mIconMap.put(key, icon); mIconList.add(icon);if (n == null) {
//状态图标处理 } else {// is notification add notification icon //添加左边通知图标,如sd卡,usb图标等,mNotificationIcons=IconMerger android:id="@+id/notificationIcons" int iconIndex = mNotificationData.getIconIndex(n); mNotificationIcons.addView(icon.view, iconIndex); } } else { if (n == null) { // right hand side icons -- these don't reorder icon.update(mContext, data); } else {//is notification to update notification icon //更新通知图标 // remove old ViewGroup parent = (ViewGroup)icon.view.getParent(); parent.removeView(icon.view); // add new icon.update(mContext, data); int iconIndex = mNotificationData.getIconIndex(n); mNotificationIcons.addView(icon.view, iconIndex); } } } }11.状态图标更新 --1.通过广播接收器的方式
当StatusBarPolicy被构建的时候,会注册一个广播消息接收器mIntentReceiver:
IntentFilter filter = new IntentFilter();// Register for Intent broadcasts for...
filter.addAction(Intent.ACTION_TIME_TICK); filter.addAction(Intent.ACTION_TIME_CHANGED); ...... mContext.registerReceiver(mIntentReceiver, filter, null, mHandler);一旦接收到状态图标变化消息,就会通知StatusBarService去变更状态图标,还是以状态栏的时钟为例: if (action.equals(Intent.ACTION_TIME_TICK)) { updateClock();//此处接收时间变化消息 } else if (action.equals(Intent.ACTION_TIME_CHANGED)) { updateClock();//此处接收时间变更消息-->updateClock() -->StatusBarService.updateIcon(IBinder key, IconData data, NotificationData n) -->addPendingOp(OP_UPDATE_ICON, key, data, n, -1); }
这个跟前面添加状态图标调用是一致的,只是addIcon中addPendingOp(OP_UPDATE_ICON, key, data, n, -1);操作是 OP_UPDATE_ICON,所以,同样,
方法会执行到performAddUpdateIcon,后面逻辑见前面讲述的状态图标更新。--2.通过远程代理方式
StatusBarManager有一个更新图标的方法: public void updateIcon(IBinder key, String slot, int iconId, int iconLevel),不过StatusBarManager并未把方法公开在sdk中,但是应该有方法可以访问的,
像launcher就有访问framework中未公开在sdk中的方法,如何实现这里我不作讨论。//StatusBarManager.updateIcon// public void updateIcon(IBinder key, String slot, int iconId, int iconLevel) { try { mService.updateIcon(key, slot, mContext.getPackageName(), iconId, iconLevel); } catch (RemoteException ex) { // system process is dead anyway. throw new RuntimeException(ex); } }mService是StatusBarManager的一个成员变量,StatusBarManager被构建的时候被赋值,他是IStatusBar的一个代理对象StatusBarManager(Context context) {
mContext = context;//
mService = IStatusBar.Stub.asInterface( ServiceManager.getService(Context.STATUS_BAR_SERVICE)); }